
OMNeT仿真
初始安装配置
🧩 第 0 步:下载和安装 OMNeT++
选择版本:
👉 OMNeT++ 6.0.1 或 6.0.2(官方 Windows 兼容) 下载地址(官网): https://omnetpp.org/download/
安装步骤概述:
-
下载 ZIP → 解压
-
打开
mingwenv.cmd(这个是必须的环境) -
在弹出的终端执行:
./configure make -
然后运行
omnetpp就会启动图形化 IDE(Eclipse)。
这个过程大概 10–20 分钟。
第 1 步:下载 INET 框架
推荐与你的 OMNeT++ 版本兼容:
OMNeT++ 6.x → 用 INET 4.5.x
下载 INET: https://github.com/inet-framework/inet/releases
解压后你会看到 INET 根目录。
在同样的 mingwenv 环境中运行:
cd inet
source setenv
make makefiles
make -j4
等待几分钟。
导入 INET 到 OMNeT++ IDE
在 OMNeT++ IDE 中:
File → Import → 选择General文件夹 → Existing Projects into Workspace
选择 INET 根目录 → Finish
你的工程列表里会看到 INET。
网络仿真
第 0 步:打开IDE
进入你的 OMNeT++ 安装目录,双击 omnetpp.exe
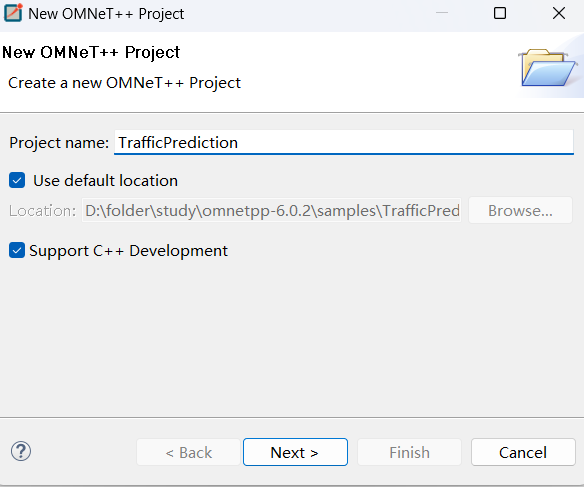
第 1 步:创建你的项目
在 IDE 里:
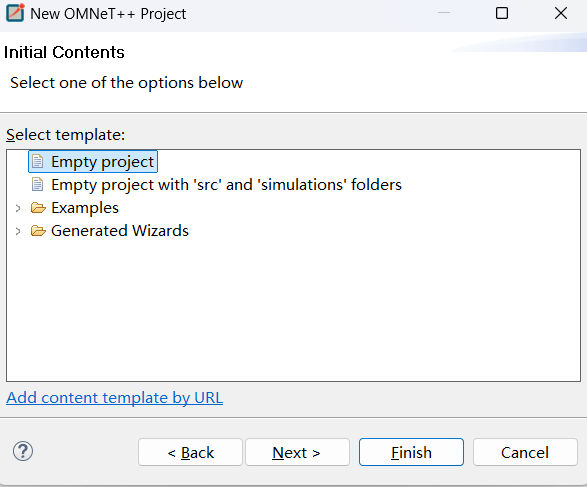
File → New → OMNeT++ Project → Empty Project
项目名:TrafficPrediction
Finish
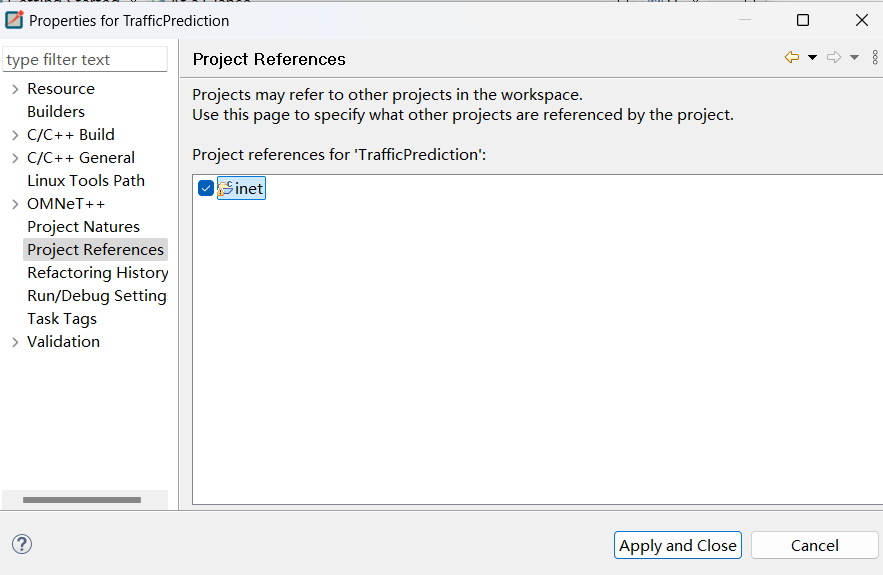
设置 TrafficPrediction 依赖 INET(非常关键)
现在手动设置 INET 依赖:
- 右键 TrafficPrediction
- 点击 Properties
- 左侧选 Project References
- 在右边勾选 inet
第 2 步:创建文件夹、文件
项目结构如下:
UdpDemo/
│
├── simulations/
│   ├── SimpleUdpNetwork.ned     ← 网络拓扑(重点)
│   ├── omnetpp.ini              ← 仿真配置(重点)
│   └── package.ned              ← 自动生成(可以忽略)
│
├── src/                         ← 本 demo 不需要写 C++,这个空着
│
└── Makefile                     ← OMNeT++ 自动管理
SimpleUdpNetwork.ned
//
// This program is free software: you can redistribute it and/or modify
// it under the terms of the GNU Lesser General Public License as published by
// the Free Software Foundation, either version 3 of the License, or
// (at your option) any later version.
//
// This program is distributed in the hope that it will be useful,
// but WITHOUT ANY WARRANTY; without even the implied warranty of
// MERCHANTABILITY or FITNESS FOR A PARTICULAR PURPOSE.  See the
// GNU Lesser General Public License for more details.
//
// You should have received a copy of the GNU Lesser General Public License
// along with this program.  If not, see http://www.gnu.org/licenses/.
//

package udpdemo.simulations;
import inet.networklayer.configurator.ipv4.Ipv4NetworkConfigurator;
import inet.node.inet.StandardHost;
import inet.node.inet.Router;

network SimpleUdpNetwork
{
    submodules:
        configurator: Ipv4NetworkConfigurator {
        }

        hostA: StandardHost {
            @display("p=100,200");
        }

        router: Router {
            @display("p=300,200");
        }

        hostB: StandardHost {
            @display("p=500,200");
        }

    connections allowunconnected:
        hostA.pppg++ <--> { delay = 1ms; datarate = 100Mbps; } <--> router.pppg++;
        router.pppg++ <--> { delay = 1ms; datarate = 100Mbps; } <--> hostB.pppg++;
}
omnetpp.ini
[General]
network = udpdemo.simulations.SimpleUdpNetwork
sim-time-limit = 30s

# 自动 ARP,减少日志噪声
**.arp.typename = "GlobalArp"

# HostA 配置一个 UDP 发送应用
*.hostA.numApps = 1
*.hostA.app[0].typename = "UdpBasicApp"
*.hostA.app[0].destAddresses = "hostB"
*.hostA.app[0].destPort = 5000
*.hostA.app[0].messageLength = 1000B
*.hostA.app[0].sendInterval = 1s
*.hostA.app[0].startTime = 1s

# HostB 配置一个 UDP 接收器
*.hostB.numApps = 1
*.hostB.app[0].typename = "UdpSink"
*.hostB.app[0].localPort = 5000
第 3 步:编译项目
菜单: Project → Build All
第 4 步:运行仿真
右键 omnetpp.ini:
Run As → OMNeT++ Simulation
运行后你会看到:
- hostA 每秒发出一个 UDP 包
- hostB 收到包
- router 转发
- 可以点击连接查看流量、抓包
- 可以打开 Result 分析包数吞吐量
命令行模式
第一步:修改 omnetpp.ini
Cmdenv 如果不加限制,会在屏幕上疯狂打印每一条日志,这比图形界面还慢。请确保你的 [General] 部分包含以下设置:
[General]
# ... (你的其他配置) ...

# ============================================================
# Cmdenv 性能优化配置
# ============================================================
cmdenv-express-mode = true          # 开启极速模式
cmdenv-performance-display = false  # 关闭性能数据显示 (CPU/内存占用等),进一步减少I/O
cmdenv-status-frequency = 10s       # 每10秒才在屏幕上打印一次进度,防止刷屏
**.cmdenv-log-level = off           # 彻底关闭模块的文本日志输出 (最关键的一行)

# 确保不记录 eventlog (体积巨大且拖慢速度)
record-eventlog = false
第二步:选择运行方式
1)在顶部菜单栏,点击 Run -> Run Configurations...。
2)在左侧栏找到 OMNeT++ Simulation,展开它,点击你的运行配置(通常叫 TrafficPrediction 或者 omnetpp.ini)。
3)在右侧面板中,点击 User Interface 选项卡(或者叫 Qt/CmdEnv tab)。
4)找到 User Interface 下拉菜单,将 Qtenv (图形界面) 改为 Cmdenv (命令行)。
5)点击右下角的 apply->Run。